Friday, June 26, 2009

Peach Cheesecake

I will give the cheesecake recipe I use (from Libby Bryan in Idaho), but you can use whatever cheesecake recipe you favor.
The topping is what this post is really about!
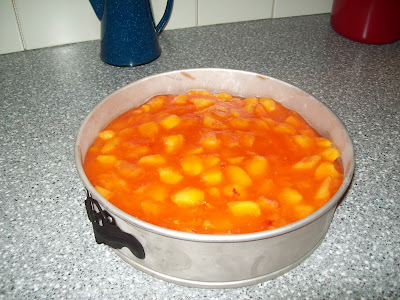
Love cheesecake? Like to try new things? Stray from the tried and true, and traditional? Years ago my Mom tried this when we had fresh peaches on hand and it became an immediate favorite with me!
Cheesecake:
1 & 1/4 cup graham cracker crumbs (1 pack,crushed)
2 Tablespoons sugar
6 Tablespoons butter, melted
Combine and press into a 10" spring form pan.
Bake 7 minutes @ 375 degrees.
While it is baking, mix 'til smooth:
2 - 8 oz. packages cream cheese (room temp.)
3 eggs
1/2 cup sugar
1 teaspoon vanilla
Pour over crust and bake 18 minutes. When it is cool, you are ready for the fruit topping of your choice.
Or... if you are not into fruit on your cheesecake, try this.
Cool 15 minutes.
Mix:
1 pint sour cream
1/4 cup sugar
1 teaspoon vanilla
Spread on top of cheesecake and sprinkle with nutmeg. Bake 5 more minutes.
Refrigerate 2 hours before serving.
FRUIT TOPPING
Cook together 'til thick:
1 cup sugar
1 cup water
2 & 1/2 Tablespoons cornstarch
While it's hot, add 3 Tablespoons jello.
Cool and add fruit.
When you use peaches, use orange jello. The peach flavored jello tastes too fake. Add as much fruit as you like.
This recipe for thickening works well for fresh fruit pies too. Like strawberry... just use strawberry jello.
I like cheesecake good and cold, so I refrigerate it for a while after I put the topping on.

Serve and enjoy!
Posted by Picasa

Sunday, June 14, 2009

Bolivian Potato Salad

Here's a real different one for you! Our brother-in-law Omar from Bolivia, South America hooked us on this one. It's a favorite amongst the family. My sister-in-law Tia just got her LPN license and we did a celebratory dinner last weekend. Since she loves this salad like I do, I made it and took the pictures so I could post it when I got time...
Peel and cube 6 cups of potatoes - I used red ones. Cook till just done, not mushy, with minced garlic in the water. Cool. (I like to get everything ready the night before so the ingredients are cold and ready to put together.)

Peel and dice approx. 2 cups carrots, cook 'til tender crisp. Cool. (you can use frozen)

Add 2 cups frozen peas.
Also 2 cans diced red beets, drained.
For dressing, all the original recipe calls for is mayonnaise and of course salt and pepper. Toss all ingredients, chill, and serve. The longer it sets, the pinker it gets!

I happen to like to add some basil pesto into it to jazz it up a bit. It really is interesting with all the different textures.
Posted by Picasa

Friday, April 17, 2009

Oatmeal

After posting the recipe for Baked Oatmeal, I thought I must put in a plug for cooked oatmeal yet too. I have learned a couple ways my girls do really enjoy it...
Since most folks know how to cook it, I won't give the how to's. Just add:

BUTTER, BROWN SUGAR, and VANILLA
Don't be stingy, either! Especially with the butter... remember butter is an all-natural fat, just the way God made it and kids need that! (I'm just a big kid, right?)

The other alterative that works well at our house is...are you ready?....
CHOCOLATE CHIPS
Need I say anymore? In our defense, we are an all girl household most mornings!

Baked Oatmeal

What I have here is a recipe for baked oatmeal. Oatmeal will never be the same again, after you have tried this! We love it!

Baked Oatmeal

3 cups oatmeal, quick or rolled
1/2 cup butter, melted
1/2 cup brown sugar
2 eggs, beaten
2 tsp. baking powder
1 tsp. salt
1 cup milk
cinnamon (optional)
Pour in a greased pan. I use a glass 9"x11".
Bake @ 350 for 40 minutes
In a hurry? Crank it up to 400 and it'll be done in 30 minutes.

Now for some variations...
I have found the melted butter in the microwave after the oatmeal was baked. It turned out ok, but the butter does make it better!
The original recipe given to me, says you can use syrup in place of brown sugar. I have never tried that.
You can also exchange apple juice for the milk, which I have also never done. We are a milk loving household!
I usually leave out the cinnamon, but it's just personal preference.
We love to eat this with homemade yogurt and fruit over it. Thickened fruit, like pie fillings, are good, but just about anything you like, goes!
For some reason, Baked Oatmeal is really great leftover. Just cold and plain. I have never had a problem knowing what to do with it, when I make too much. It's always gone by the end of the day.
For those of you who like to eat soggy food, it just might be good with milk over it. I say that grudgingly, I can't figure out the whole liking for soggy food. Give Abe a pack of graham crackers and a bowl of milk and he's smiling! I guess that comes from growing up eating things like "milk soup". (Cold milk, fruit, cubed bread, and sugar)
I love making Baked Oatmeal for company. People always like it! You can make it up the evening before and pop it in the oven when you get up. By the time you are dressed and combed it's ready to serve.
Happy eating and a great morning to you!

Monday, March 23, 2009

Venison Jerky

We have learned it is quite simple to make our own jerky. Abe got quite into it this fall and he made a lot. I don't just love cutting meat so he obliges me by doing that part. Actually all I usually end up doing is the "jerking" ! :) We found it works well to throw the meat in the freezer and then make it at our leisure, as we want more. Meat also slices easier when it's a bit frozen. We have a seasoning recipe from my uncle, but you can change and experiment as much as you like.
Here goes:
Uncle David's Jerky
For 32 lbs. meat:
3/4 cup soy sauce
4 Tablespoons Worchestershire sauce
3/4 - 4/5 cup liquid smoke
4 Tablespoons black pepper
3 Tablespoons onion salt
3 Tablespoons garlic salt
10 Tablespoons salt
Mix this all together to dissolve the salts. Use this to marinade the meat, at least overnight or for days. We cut this recipe down to do about 4 lbs. at a time. It will not seem like a lot of liquid, but remember whatever you add, it has to be dried back down. We liked adding fresh jalapeno peppers to this. We tried minced fine for a hot bite now and then, or pureed for an over-all warmth. We also added cayenne pepper for heat. Abe also likes to add Montreal Steak seasoning. (It's his favorite for steak, why not on the jerky?)


I have cooling racks that fit on my baking sheets. You can put the strips of meat right on the pan, but I think it speeds it up to allow air to circulate under. We put it in the oven at 190 degrees. Put a wooden spoon in the door to keep it cracked open just a bit to allow moisture to escape. Depending on how thick you cut the meat, the drying time varies. Usually 3-4 hours. We do it in the evening. It always dries a bit further as it cools, and we don't like it crackling dry, so you can turn it off just a bit before you think it's done and leave it in the oven as it cools down. Two pans like this don't last us very long! I think 4-5 lbs. of meat make about 4 pans. If you make a large quantity, keep it in the freezer to avoid spoiling, just in case it's not dried enough.

If you lived near us and passed Abe on the road, he'd probably stop and talk a while and share a handful. Our neighbors and friends all like it by now! Thanks, Uncle David!

Posted by Picasa

Saturday, March 21, 2009

Feather Light Pancakes

At our house, pancakes are a well received breakfast. We like this recipe:
Feather Light Pancakes
2 cups flour - I use fresh ground fine whole wheat
1 teaspoon baking soda
3/4 teaspoon salt
3 Tablespoons sugar
Combine:
2 beaten eggs 1 & 3/4 cups milk
1/4 cup vinegar 1/4 cup oil or melted butter
Mix well. Add to dry ingredients, stir until smooth. Bake on hot griddle. Yield - 20
Now for variations:
I recently learned from my brother-in-law (who would have thought!) that if you like added nutrition and are a flax seed fan, you can exchange 1/2 cup of the flour for 1/2 cup ground flax seeds. They turn out really good! My kids never noticed the difference.
If you like blueberry pancakes, just sprinkle a few fresh or frozen ones on each pancake while the first side is baking. This fall my brother went home to Idaho for a visit and came back with some huckleberries. He was sweet enough to share and using them on pancakes makes a little go a long way! Talk about bring back memories! Straight from God's garden!
On a birthday last fall we tried the teddy bear shape here. That was a real hit and just takes a bit more time. We all have lots of that, don't we?! :)
The girls used chocolate chips for eyes and buttons, which soon went to nose, smiles, paws... Anything to get a bit more chocolate on there! We found if you put them on right away, then they get all melty and you can spread chocolate out all over! Big hit!!! (We have other non-traditional ways of using chocolate chips if you need any tips! :))
Now for syrup... My Mom always used this recipe. I have no idea where it came from!
Pancake Syrup
1 cup brown sugar
1 cup white sugar
4 Tablespoons flour
2 cups water
1 cube butter
2 teaspoons vanilla
Mix sugars and flour, add water and cook till thickened. Add butter and vanilla and stir till melted. Serve warm. This syrup is good on waffles or anything else you use pancake syrup on.
Now, I usually like to cut back on the sugar in anything, as much as possible without sacrificing too much taste. This syrup can take it! I go way skimpy on the sugar and way heavy on the flour. Then I keep adding water as it thickens till it's the right consistency. I also like to add a bit of maple flavoring. Note: You only need half of this recipe for the pancake recipe above. Leftover does keep in the fridge, but not indefinitely!
When you ask Abi if something is good, if it is, she nods and gives a thumbs up! The more she likes it, the more emphatically she does it. You can see how she rates these!
Posted by Picasa

Thursday, February 5, 2009

Homemade Butter


Many's the time I have heard it said that you can't make butter in a blender. Don't ask me why!
To do a little myth busting, I'm here to inform you that is the only way I've ever made it!

We get fresh milk locally, so I make some of our butter. (We like to use our milk whole most of the time, thank you!)
I have a very convenient set-up right now, but use what you have, I'm sure it will work fine.

Start by skimming the cream off the top of the milk. You can see in the top left photo about how much cream is there.
I use the Magic Bullet (as seen on TV) and the amount off of one gallon is just right. Use the flat blade to whip it.
(I have used a number of different makes of blenders over the years, they have all worked.)
It takes about a minute. First the cream whips. You have to work with it a little bit once it's whipped cream,
but all at once the milk and butter separate. Use a spatula to press the butter into a solid lump.
Pour the buttermilk through a strainer into a jar. (Catch the flecks of butter that way.)


Next, using clean hands of course, knead the butter under a stream of cold running water. This washes the butter.
Keep on till all the milk is worked out. I've noticed if you don't wash it enough, the butter gets old faster.
After, it's washed, start adding salt. It's amazing how much salt it takes to get it tasting right!
Yes, you read right! The only way I know is to taste a pinch! The taste is awesome!
A world away from what store-bought butter tastes like!


Now here's a little account of what I call "fresh evidence". You know how little things happen that spell out to you that God knows and loves you, personally!?! Well, I had seen and admired what is called a "butter bell" at Lehman's Hardware. It is supposed to keep butter fresh and at a more spreadable temperature. The only problem was, it was pretty spendy and I didn't know if I would actually like it and end up using it much. Plus... it had a green and pink flower or apple or something on it that was nice, but just not what would look good setting in my kitchen. No big deal... I just thought of it once in a while... should I, shouldn't I?


Then one day as I browsed the shelves in our local Goodwill store, what did I see, to my amazement, but new in the box,
the little gem you see right here. Needless to say it went right in my cart! I think God had my name on it.
Simple BLUE lettering, and it gives me pleasure every time I look at it! Thank You, Lord!
The lovely part of it is, the amount of cream from one gallon of milk (Brown Swiss) fits in the Magic Bullet cup, and the usual amount of butter just fills the bell! (1/2 cup) I like to just make that much at a time so it's very fresh. My dear hubby feels horror almost, at the thought and smell of sour cream butter. (No offense to you sour cream butter lovers!)
This is very simple and quick to make and is especially worth it when you have fresh bread or cornbread to serve it on.
Remember, this is raw butter if you used raw milk, and will not keep long.
You can make bigger quantities and freeze what you don't use in a day or two.

Now, about the buttermilk...
I put a little store- bought cultured buttermilk in it as starter and leave it set on the counter to thicken up a bit. If it's warm, overnight is fine. I have not yet figured out how to turn it out successfully, consistently, so if you have any tips, please help me out?
The recipe I use for cornbread is tastiest when made with buttermilk, so I like to have it on hand.

One last tip...when using fresh butter... slather it on thick enough to see your teeth marks in it when you take a bite,
(At least a spot big enough for one bite!) because simple pleasures are the best!

Posted by Picasa

Friday, January 16, 2009

Our Favorite Way to Eat Homemade Yogurt

We love this simple dish. I don't know of a desert we enjoy more!
Simply peel and core apples, (Mama's job) slice (daughter's job), and
put in a kettle. Add raisins (toddler's job) and a little water to cook.
Add cinnamon to taste.

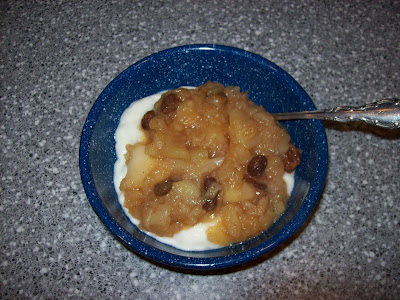
This is how the finished product looks. Depending on the type of apple used,
you don't need to add any sugar. The raisins sweeten it.
Of course, you decide the raisin/apple ratio.

Serve still warm over cold yogurt. Daddy's job when eating it is usually
to groan and go for another dish. I don't know why it's so good.
It really doesn't sound that great, but there's something about the contrasts!

The great thing is, it isn't really a desert, so it can be breakfast... etc.
This fall I canned some apples this way so we can have it on short notice!
Posted by Picasa

How To Make Easy Homemade Yogurt

This recipe is for one gallon of yogurt. Of course you can make less, just do the math. You don't need any special equipment. You will see here what I use and common sense will help you figure out how to do it with what you have on hand. I use raw organic cows milk from a local blessing for $3 a gallon. Kind of hard to buy a gallon of yogurt for that, isn't it?

Start with: Dissolve 2 Tablespoons unflavored gelatin in 2/3 cup cool water. (Top left picture)
(I am able to get it at a bulk food store, but Knox gelatin is fine. Two envelopes will do. Bulk is cheaper and you're not out so soon.)
Heat 1 gallon (minus a cup to make room for added ingredients) milk to 180 degrees. The old-fashioned term is "scald" it, a thermometer just takes the guess work out of it. If you stir it constantly as it heats it seems to turn out creamier yogurt. I guess something to do with heating it evenly and gradually. It takes some time but can be done with a book in the other hand! :)


Then add: The dissolved gelatin, sweetener to taste, (I use 1/2 cup fructose)
and vanilla. (I just pour - maybe 2 Tblsp.?)
Of course you may leave it unsweetened and plain.
Cool to 130 degrees, it doesn't take long if you set it in the sink in cold water. Again, stirring while it cools makes it better. Last but not least, add 1/2 cup yogurt as starter. I like Dannon, you can experiment, but just make sure it contains live cultures. Once you have your own made, you can use it next time. Whisk to blend in. Strain into jar. (Not essential to strain, but it insures a smoother texture.)


I set my jar in this 2 gallon cooler. It is one of God's little goodnesses to me. I love red and blue in my kitchen and ones in the store are orange, etc. I happened to find this one, like new, for $3 at a second hand store. It's perfect! (Further evidence God knows me!) (Two quart jars fit in an Igloo lunch box.) Fill up to the neck of the jar with hot tap water.Let sit for three to 4 hours or until thick. If you use your own yogurt as starter, it seems to incubate faster. Storebought takes the full 4 hours. The longer it sets, the sourer it gets. I like to catch it as soon as it's thick and very mild. The little ones like it better! Take out, refridgerate and enjoy!


If you have any questions, please ask them in the comments.
Also, if you know any tips, or a better way, I'd love to learn it!
Favorite uses, too!

Grandmother's Old Fashioned Oatmeal Cookies


This recipe is a favorite at our house.
I have found that even some folks that don't like raisins, like them!
I've discovered that if you use fresh ground whole wheat flour, they turn out just as good!
I will not be posting recipes that taste "healthy",
just those that taste great and hopefully fall somewhere in the "healthy" category.

Grandmother's Old Fashioned Oatmeal Cookies
1 cup raisins
3 eggs, beaten
1 tsp. vanilla
Soak these first three ingredients for an hour.
If time gets away from you like it often does for me, don't worry!
It doesn't hurt anything for it to sit longer.
Cream: 1 cup butter
(I use half Expeller Pressed, Naturally Refined, Pure Coconut Oil)
1 cup white sugar
1 cup brown sugar
Add the egg mixture to this and mix.
Next, add and mix well:
2 &1/2 cups whole wheat flour
2 tsp. soda
3/4 tsp. salt
1 tsp. cinnamon
Then add: 2 generous cups oatmeal
(I like quick oats, but rolled is fine too.)
1/2 to 1 cup chopped nuts, optional
Roll in balls; dip the bottom of a cup in sugar and press. (Kids love to help!)
Bake in 350 degree oven for approx. 8 minutes. Do not over bake!

The secret to these cookies great taste is the raisins soaking in the vanilla/egg.
Their great texture is ruined if you over bake. Ask me how I know!!
If anything, under bake and be sure to bang the pan a bit when you take them out of the oven!
They are very more-ish!
Posted by Picasa